


Introduction
Your Achievement Diary will be available to you at all times. To access it, simply look at your Control Panel and choose the Quest Asterisk symbol. ![]()
In the top-right corner of the quest list, there is a small green star. Click on it to find your Achievement Diary. While on the Achievement Diary list, click the blue star to go back to your quest list. There is a picture of the icon below.
Return to Top
Starting
The Falador Achievement Diary contains tasks that can be completed by low, medium, and high level players.
What to wear is for you to decide, using your best judgement. Only selected tasks directly involve combat, so armour will not be necessary except for very low levels, who may want defence against ordinary monsters that exist around the towns. If you were going to fight a monster you would want armour and weapons. However, if you do not plan to do anything involving fighting and will be in a safe area, then lightweight clothing is suggested. (For more information on monster fighting, view the guides in our Monster Hunting guides.)
The Explorer Ring 3 reward from the Lumbridge Achievement Diary will be a big help in this diary, since the Cabbage Teleport brings you to Falador's farm and a convenient walk to Port Sarim.
Before you can begin fulfilling your Achievement Diary, you need to talk to any one of three NPCs. The following list shows the three NPCs and their locations:
- Redbeard Frank: Port Sarim, outside the pub
- Chemist: Rimmington, house on the coast west of the town
- Squire: Falador, courtyard of the White Knight's Castle
Once you've spoken to one of them, your Diary won't look any different. However, the first time you complete a task in the diary, the entry will turn yellow (showing that you've started the Diary, similar to the quest list.) If you click on the Diary, it pulls up a parchment list in your main game window. You can scroll through it to see the complete list of tasks.
Every time you finish a Diary task, you will get a message in your chat window stating that you've completed a task and it's been recorded in your Achievement Diary. Open the Diary and you'll see a red line has been marked through that task.
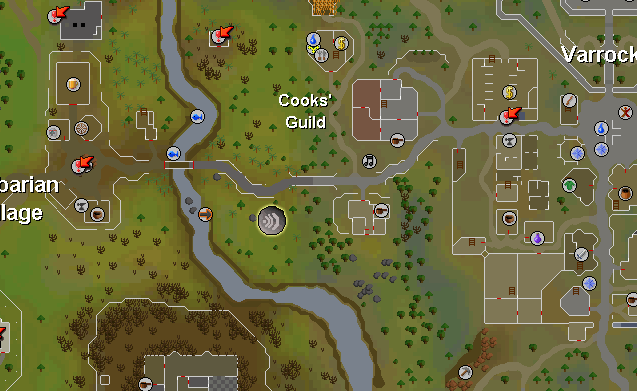
Once you've started the Diary, you can perform the tasks in any order and at any level (Easy, Medium or Hard) that you wish. In order to help players plan effectively, a map showing the location for each task is available. It shows a code number for each task, which matches the lists in this guide. Check the map, bring what you need, and you're on your way!
| Click here to view the Falador Diary Locations Map |
Return to Top
Easy Tasks
Easy tasks follow this criteria:
- Easy-ranged quest requirements.
- Easy-ranged skill requirements.
- Easy to medium level of difficulty.
| EASY TASKS | |||
| Map Code | Task | Quest Requirements | Other Requirements |
| E1 | Buy a Farming amulet from Sarah on the farm north of Port Sarim | None | 200 gp |
| Go to farming shop in the farmhouse south of Falador. An Explorer ring 3 cabbage teleport is handy to get there. | |||
| E2 | Buy a stat-boosting beer from a waitress in the Rising Sun tavern. | None | 3 gp |
| Talk to any waitress in the Falador pub to buy any of the beers they sell. | |||
| E3 | Buy a black chainbody from Wayne's Chains, and try it on in the shop | None | 1440 gp, 10 Defence |
| Wayne's Chains is on the south wall of Falador, next door to the spinning wheel. | |||
| E4 | Climb to the top of the White Knights' Castle. | None | None |
| Climb the western tower of the White Knights' Castle in Falador. | |||
| E5 | Discover your family crest from Sir Renitee. | None | 16 Construction |
| Go to the eastern end of the White Knights' Castle in Falador, and up one floor. There is also a hard task (H2) here, so you may want to do that at the same time (costs 5000 gp, requires 70 prayer). Be aware that any *change* in your crest will change all decorations in your house. | |||
| E6 | Enter the mole’s lair under Falador Park. | None | Spade, light source |
| Use a spade on one of the many mole mounds in Falador Park, which is in the middle of Falador. Be sure your lantern is lit. The exit is at the south end of the lair (bringing you out near the chainmail shop, another task!), so if you'd prefer to avoid the Giant Mole, bring a teleport. You do not need to go anywhere near the Giant Mole to cross off this task, but if you'd like information about it, check our Giant Mole Hunting Guide. | |||
| E7 | Feed Ridgeley, the hairdresser’s pet. | None | Cheese |
| Use a piece of cheese on the treadmill in the hairdresser's shop north of the Falador's west bank. | |||
| E8 | Fill a bucket from the pump north of the west Falador bank. | None | Bucket |
| Walk to the pump and use your bucket on it. | |||
| E9 | Heal an elemental wizard by casting an appropriate elemental spell on him (air, water, earth, fire). | None | Runes |
| Elemental wizards hang out with Malignius Mortifer, south of Falador near the crossroads leading to Rimmington. | |||
| E10 | Kill a duck in Falador Park. | None | Mage or Range supplies |
| Use a spell or a ranged weapon to kill a duck in Falador park. | |||
| E11 | Kill a highwayman on the road south of Falador. | None | Weapon |
| Highwayman (level 7) can be found near the crossroads south of Falador's south gate. Save his cape drop for a later task. | |||
| E12 | Make an air tiara. | Rune Mysteries | 1 air talisman, 1 tiara |
| Bring air talisman and silver tiara to the Air Altar south of Falador's walls. Use your talisman on the Mysterious ruins (for the exact spot click here). Inside, use the talisman on the altar to make an air tiara. | |||
| E13 | Pop a party balloon. | None | may need 1000 gp |
| Go to Party Pete's castle in northeast Falador. If nobody is already having a party, it costs 5000 gp to pull the lever to make the balloons drop. | |||
| E14 | Recharge your Prayer points at the altar south-west of Port Sarim. | None | None |
| Go to the chapel and click on the altar. If your prayer is already full, turn on a prayer to reduce it a bit first. | |||
| E15 | Take the boat to Entrana. | None | Bank space for all your combat items |
| To take the boat, speak to any Monk of Entrana on the dock south of Port Sarim pub. They will not transport you if you are wearing any combat gear, so no armour, no weapons (nothing you can wield in weapon slot), no gear that has stat boosting value. | |||
For information about the rewards for this set of tasks read below.
Return to Top
Medium Tasks
Medium tasks follow this criteria:
- Medium-ranged quest requirements.
- Medium-ranged skill requirements.
- Medium level of difficulty.
| MEDIUM TASKS | |||
| Map Code | Task | Quest Requirements | Other Requirements |
| M1 | Craft a fruit basket using the loom at the farm north of Port Sarim. | None | 6 willow branches, 36 Crafting |
| Use willow branches on the loom located in the southeast corner of the Falador farmhouse. | |||
| M2 | Crawl under Falador’s south wall. | None | 26 Agility |
| The agility shortcut is on the wall south of Falador's gem shop. | |||
| M3 | Grapple up, and then jump off the north Falador wall. | None | mithril grapple, crossbow, 11 Agility, 19 Range, 37 Strength |
| Must be done from outside Falador's north wall. | |||
| M4 | Increase your reputation with the White Knights by killing a black knight. | Wanted! | weapon, armour |
| Black Knights can be found various places. The easiest is probably the one wandering south of Draynor's bank. They are found in greater numbers at the Black Knight fortress on Ice Mountain, Taverly Members' Dungeon, Level 30-32 wilderness, and the wilderness Lava Maze. | |||
| M5 | Kill an ice giant in the Asgarnian Ice Dungeon. | None | weapon, armour |
| The level 53 Ice Giant is found in the Ice Caves dungeon located south of Rimmington, east of Thurgo the dwarf, and just north of Mudskipper Point. You might want to bring a pickaxe and mine a blurite ore while you are here. | |||
| M6 | Light a bullseye lantern in the chemist’s. | None | Bullseye lantern, tinderbox, 49 Firemaking |
| The chemist is located west of Rimmington. If your bullseye lantern (made from a steel bar and a glass lantern lens) does not have oil in it, bring a swamp tar to make oil at the chemist's lamp still. Use your tinderbox on the full lantern to light it. | |||
| M7 | Pickpocket a Falador guard. | None | 40 Thieving |
| Right-click a Falador guard to pickpocket him. | |||
| M8 | Place a scarecrow to protect your sweetcorn as it grows in the patch north of Port Sarim. | None | 23 Farming, scarecrow, 3 sweetcorn seeds, seed dibber |
| If you do not have a scarecrow, make it from a bronze spear, a sack of hay and a watermelon. Plant sweetcorn in one of the allotment patches, then use the scarecrow on the flower patch. | |||
| M9 | Salute Sir Tiffy while wearing full initiate armour. | Recruitment Drive | Initiate armour, 20 defence, 10 prayer |
| Sir Tiffy Cashien sits on a bench in Falador Park, west of the tree patch. Armour consists of Initiate sallet, Initiate hauberk, and Initiate cuisse or tasset (skirt). | |||
| M10 | Smith some blurite crossbow limbs on Thurgo’s anvil. | Knight's Sword | 10 Mining, 13 smithing, pickaxe, 1 blurite bar, hammer |
| Mine one blurite ore in the Ice Caves dungeon. Smelt it at a furnace (or use Superheat spell) to make a bar. Use the bar on Thurgo's anvil while carrying a hammer and make one crossbow limbs. | |||
| M11 | Travel from Port Sarim to Musa Point for free (with a little help from Charos). | Garden of Tranquillity | Ring of Charos(a) |
| Go to Port Sarim docks east of the Fishing shop. Talk to Seaman Lorris, Seaman Thresnor or Captain Tobias. Wearing your Ring of Charos(a), use the *charm* option in the dialog box to get a free trip to Karamja. | |||
| M12 | Visit the Port Sarim rat pits. | Rat Catchers | None |
| Climb down the Manhole north of Port Sarim's Fishing Shop. | |||
For information about the rewards for this set of tasks read below.
Return to Top
Hard Tasks
Hard tasks follow this criteria:
- Higher-ranged quest requirements.
- Higher-ranged skill requirements.
- Higher level of difficulty.
| HARD TASKS | |||
| Map Code | Task | Quest Requirements | Other Requirements |
| H1 | Ascend the Dark Wizards' Tower while wearing full proselyte armour. | Slug Menace | 30 defence, 20 prayer, full proselyte armour |
| Armour consists of Proselyte sallet, Proselyte hauberk, and Proselyte cuisse or tasset (skirt). | |||
| H2 | Change your family crest to the Saradomin symbol. | None | 16 Construction, 70 prayer, 5000 gp |
| Go to the eastern end of the White Knights' Castle in Falador, and up one floor. Talk to Sir Renitee. Be aware that changing your crest will change all decorations in your house. | |||
| H3 | Craft 196 or more air runes simultaneously. | None | 66 Runecrafting, 28 rune essence, air or omni tiara or staff, or abyss access |
| Take 28 rune essence to the Air Altar south of Falador, using whatever means needed to enter (air tiara or staff, omni tiara or staff, or using the abyss). Click the altar to craft the runes. Players report that assist does not work. | |||
| H4 | Cut down a yew or magic tree that you grew in Falador Park. | None | 60 Farming, 60 Woodcutting, axe |
| Visit your yew or magic tree in Falador Park tree patch. Paying the farmer to cut it down will not accomplish this task. | |||
| H5 | Dial to the fairy ring on Mudskipper Point. | A Fairy Tale Part II - Cure a Queen | Dramen or Lunar Staff |
| Use fairy ring code A I Q. | |||
| H6 | Dye a cape pink with dye from Betty in Port Sarim. | Hand in the Sand | 20 gp, an ordinary cape |
| Get an ordinary cape (black, red, blue, green, yellow, orange, purple). Buy pink dye from Betty in the Port Sarim rune shop for 20 gp. Use the dye on the cape. | |||
| H7 | Enter the Mining Guild. | None | 60 Mining |
| The entrance to the Mining Guild is in the courtyard south of Falador's East Bank. | |||
| H8 | Kill a mogre at Mudskipper Point. | None | 32 Slayer, 1 Fishing Explosive, weapon, armour |
| Use a fishing explosive on the Ominous Fishing Spot (bubbling water) on the west coast of Mudskipper Point to lure a level 60 mogre out of the water. Kill it however you wish. You must have unlocked mogres by doing some things for Skippy (see the Mogre entry for detailed information) before you can kill mogres. | |||
| H9 | Kill a skeletal wyvern in the Asgarnian Ice Dungeon. | Jagex recommends Elemental Workshop I | 72 Slayer, Elemental or Mind or Dragonfire shield, slash weapon, armour and combat supplies |
| The level 140 Skeletal Wyvren resides in the Ice Caves east of Thurgo the dwarf. Wielding an Elemental or Mind shield is essential, it hits in the 50s otherwise. The Dragonfire shield will work, but *not* an Anti-dragonbreath shield. | |||
| H10 | Summon an ibis in the Port Sarim fish store. | None | 56 Summoning, Ibis pouch |
| Go to the Port Sarim fishing shop and activate an Ibis summoning pouch. If you need to make the pouch at an obelisk, you'll need a blank pouch, a green charm, 107 shards and a harpoon. | |||
For information about the rewards for this set of tasks read below.
Return to Top
Rewards
After touring the Falador metropolitan area, what is the reward? An upgradeable shield with prayer effects! All three shields restore some prayer once a day!
All Easy Tasks complete
After completing all the easy tasks speak to Redbeard Frank to receive Falador Shield 1. Left-Click "prayer-restore" restores 1/4 of your prayer points but can only be used once per day. This shield gives a +3 prayer bonus as well. When you operate the shield, you can do a special shield emote. You also get an experience lamp worth 1000 xp.
| Falador Shield 1 | ||||||||||||||
| Pic | ||||||||||||||
| Attack | Defence | Other | ||||||||||||
| Stab | Slash | Crush | Magic | Range | Stab | Slash | Crush | Magic | Range | Summon | Strength | Prayer | ||
| | 0 | 0 | 0 | -8 | -2 | 17 | 19 | 18 | -1 | 18 | 10 | 0 | 3 | |
All Medium Tasks complete
After completing all the Easy and Medium tasks, take your Falador Shield 1 and speak to the Chemist west of Rimmington so he can give you an upgraded Falador Shield 2 with more abilities! Left-Click "prayer-restore" restores 1/2 of your prayer points but can only be used once per day. This shield gives a +5 prayer bonus as well. Wielding this shield allows you to earn more farming experience from the Falador farm patch (allotments, flowers and herbs). Operate the shield to do the special shield emote. You also get an experience lamp worth 5000 xp.
| Falador Shield 2 | ||||||||||||||
| Pic | ||||||||||||||
| Attack | Defence | Other | ||||||||||||
| Stab | Slash | Crush | Magic | Range | Stab | Slash | Crush | Magic | Range | Summon | Strength | Prayer | ||
| | 0 | 0 | 0 | -8 | -2 | 18 | 22 | 20 | -1 | 20 | 20 | 0 | 5 | |
All Hard Tasks complete
After completing all the easy, medium and hard tasks, take your Falador Shield 2 and speak to the Squire in the courtyard of the White Knights' Castle in Falador so he can give you the final upgraded Falador Shield 3. Left-Click "prayer-restore" restores 100% of your prayer points but can only be used once per day. This shield gives a hefty +7 prayer bonus. Wielding this shield allows you to trade mole skins and claws to Wyson the gardener for White lily seeds. The shield has the benefits of the two lower shields as well (emote, farming xp). You also get an experience lamp worth 10,000 xp.
| Falador Shield 3 | ||||||||||||||
| Pic | ||||||||||||||
| Attack | Defence | Other | ||||||||||||
| Stab | Slash | Crush | Magic | Range | Stab | Slash | Crush | Magic | Range | Summon | Strength | Prayer | ||
| | 0 | 0 | 0 | -8 | -2 | 27 | 31 | 29 | -1 | 29 | 30 | 0 | 7 | |
Congratulations on completing the Achievement Diary for Falador!

No comments:
Post a Comment